Select the SmartPad menu item to open the SmartPad records for the active Contact. If a Contact record is not open, the SmartPad menu item opens a search dialog box for locating SmartPad records by Contact name, employer, or other personal information.
The SmartPad is a historical journal that contains free-form notes regarding conversations or meetings with contacts as well as entries posted automatically by the program. It is also used as a notebook to view, create, or modify entries associated with a business, contact, or group of contacts. ECP can automatically make entries in the SmartPad for important actions concerning a contact or business record, such as Contact Scheduled Activities, Letters Sent, Phone Calls Dialed, Messages Sent, Policy and Time Log records, etc. The user can display entries for one or more contacts (Consolidated SmartPad view) and access those contact records associated with the entries.
To Specify SmartPad Posting Options:
Select Office Settings from the Office Setup menu to open the Office Administration Detail tab.
Click the SmartPad Posting/Contact Data Options tab.
Select the appropriate options in the SmartPad Posting Options section to automatically post those events to the SmartPad.
To Access the SmartPad:
From the Contact or Business Summary list, tag a record and select SmartPad from the menu.
To Add a SmartPad Record:
From a SmartPad spreadsheet, click the Add button to open the New SmartPad Entry dialog box.
Type the note text and enter a Keyword if relevant.
Mark the Private option if you do not want other users to view the entry.
Click OK to save the additions.
To Modify a SmartPad Record:
From a Smartpad spreadsheet, click on a record's date link to open the entry.
In the SmartPad Entry dialog box, make the necessary modifications and click OK to save the changes.
To Delete a SmartPad Record:
From a SmartPad spreadsheet, tag the records for deletion and click the Delete button.
Click Yes to confirm the deletion.
To Attach a File to the SmartPad:
Image and document files can be attached to SmartPad records. Common file formats such as .JPG, .GIF, .BMP, and .DOC are acceptable formats for attachment.
From an open SmartPad spreadsheet, click the Attach File button to open the Image Detail dialog box.
Enter the Contact Name, Keyword, and Description.
Click the Browse button to browse to the file for attachment, or type the path to the file in the File Name field.
Click OK to save the additions.
To Mark a SmartPad Entry as Private:
Designating a SmartPad entry as private prevents all users, apart from the user that created the entry (and those who proxy to the user), from displaying the entry.
From the SmartPad spreadsheet, tag one or more records and then click the More Features button.
Select the Record Privacy button to open the Mark Selected Record(s) as Private dialog box.
Select the Mark Selected Record(s) as Private option and the other users, if any, who will display the entry from the List of Other Users list.
Click OK to save the information.
 Using
the Consolidated SmartPad
Using
the Consolidated SmartPad
The Consolidated SmartPad is used to display the SmartPad entries for more than one contact.
To Consolidate the SmartPad:
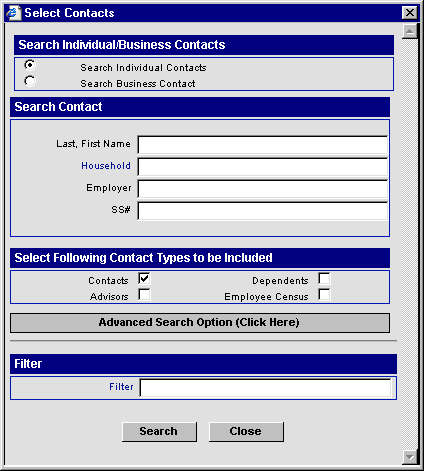
From the Home Page, select SmartPad to open the Search Individual/Business Contacts dialog box.
Enter the search criteria and click the Search button to display the corresponding Summary list.
Tag the records for SmartPad consolidation and click OK to display the Consolidated SmartPad.
To Add a Consolidated SmartPad Record:
From the Consolidated SmartPad, click the Add button to display the Contact List.
Select the Contact or Contact(s) and click OK to open the New SmartPad dialog box.
Enter the SmartPad information and click OK to post the entry to the appropriate Contact SmartPad(s).